Welcome to Axle's guide to battling on Pokemon Universe.
This guide will attempt to assist new trainers into the world of Pokemon battling. It will outline the fundamentals of battling on the Balance Server, and familiarise new battlers on how to construct an effective team which will win matches.
Let's get to it.
In your team, you have 6 slots for Pokemon. Each Pokemon can be allocated 510 Effort Values, or EV's, which can be applied by using the Sliding Bars next to the Pokemon's Stats:
- HP (The total health of your Pokemon)
- Attack (The power with which your Pokemon hit their Physical moves)
- Defence (The ability of your Pokemon to 'sponge' Physical moves from the opponent)
- Special Attack (The power with which your Pokemon hit their Special moves)
- Special Defence (The ability of your Pokemon to 'sponge' Special moves from the opponent)
- Speed (Determines which Pokemon attacks first. Higher speed -> attacks first)
It is
strongly recommended when assigning EV's, place them in Stats which your Pokemon naturally excels at. An example would be Alakazam, which has a high base Special Attack Stat, as well as a high Speed. Therefore, it would be recommended to assign all your EV's to Special Attack and Speed. You now have a very powerful special attacking, fast Pokemon.
Another example is Skarmory, which has a very high Defence stat. Again, you should assign your EV's to Defence and HP, in order to use Skarmory as a sponge for Physical attacks.
Natures:Coupled with EV's, you are able to give your Pokemon a specific
Nature. A nature is used to give a Stat increase to one of your Attack, Defence, Special Attack, Special Defence or Speed, but also lowers another one of these five Stats.
It is therefore beneficial to understand which Nature will suit your Pokemon the best.
An example would be a Modest nature on an Alakazam. A modest nature boosts Special Attack, but lowers the Attack Stat. Since Alakazam is solely a high Special Attacking Pokemon (with Special moves equipped), I would strongly recommend the use of a Modest nature on Alakazam.
A decrease in Alakazam's Attack Stat is completely negated, because it does not wish to use any Physical (Attack Stat) moves anyway, and this prevents the lowering of Defence, Special Defence or Speed.
I have included a table showing all Natures and their effects below.
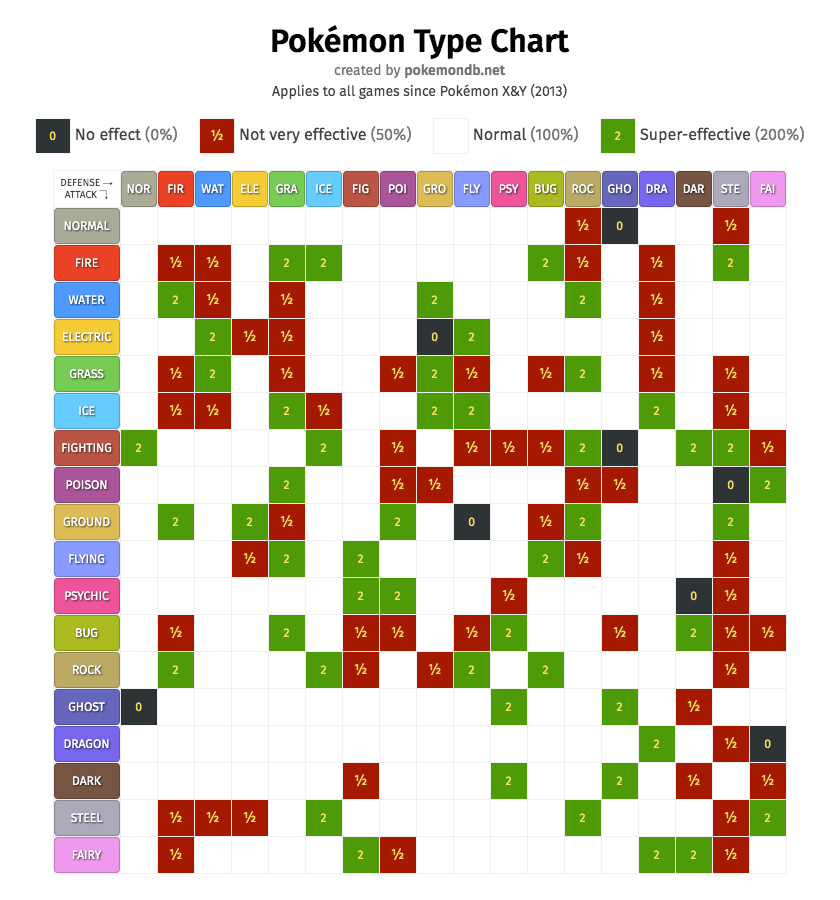
Type Effectiveness:I have included a chart indicating strengths and weaknesses in regards to Pokemon Type.
The chart includes all the Type Effectiveness', but it is useful to note that some Pokemon are 4x weak to certain attacks. For instance, a Swampert (Water/Ground) Pokemon is hit by a Grass attack. Since Water and Ground are both 2x weak to Grass, the Type Effectiveness is multiplied to 4x, and Swampert is hit extremely hard.
Abilities:Abilities are characteristics that are associated with your Pokemon, which may give you an edge, or dictate how you use your Pokemon.
An example would be Serperior's Ability called Contrary. This ability turns Stat drops into Stat gains for your Serperior. Using this Ability in combination with Leaf Storm will not only deal damage, but it will raise your Special Attack Stat 2 stages instead of lowering it 2 stages, which is highly beneficial for it.
Items:Item's play a key part in how you wish to use your Pokemon.
I will outline some of the main items that are user friendly.
- Leftovers - Gains some HP each turn
- Life Orb - Attacks hit harder, but user loses some HP each turn too
- Lum Berry - Heals your Pokemon after being Statused (Poisoned, Burned, Sleep, Frozen or Paralysis)
- Choice Scarf - 50% increase to Speed, but user can only select 1 move whilst in play
- Choice Band - 50% increase to Attack, but user can only select 1 move whilst in play
- Choice Specs - 50% increase to Special Attack, but user can only select 1 move whilst in play
- Focus Sash - Prevents your Pokemon from being One Hit Knocked Out (OHKO'd) from full HP
Which Pokemon do I choose?You
must use Pokemon from the 'Available Pokemon' List found here:
http://www.pokemon-universe.com/index.php/topic,3782.0.htmlIt is very important to
choose Pokemon that work well together and form a cohesive team, so this rules out your favourite 6 Pokemon most of the time.
A cohesive team is often characterised by their individual Roles in the team. For instance, 9 times out of 10, if you come prepared with a straight offensive team, you will be beaten by the more experienced battlers.
This is because the experienced battlers nearly unconsciously designate their Pokemon to specific Roles in the team. I will briefly discuss some of the major roles of Pokemon in an example team.
The LeadThe first Pokemon in your party is your Lead Pokemon, since it essentially sets the tone of the battle. Lead's are often characterised by their very high Speed, and often aim to deal as much damage as possible in order to gain an early momentum. With their high speed, they will often have a high Attack or Special Attack Stat, in order to maximise the damage on the opponent.
Examples:
Electrode, Aerodactyl, Mienshao
The WallThe rest of the positions in your party do not matter as much as the first slot.
The Wall is an effective way to sponge damage from opposing Pokemon. It will often be fully EV invested in HP and Defence (For a Defensive Wall) or HP and Special Defence (For a Specially Defensive Wall).
If you realise the opponent's Pokemon is primarily Physical (Attacking), switch into your Defensive Wall and absorb the hits whilst gaining a momentum. Similarly if you realise the opponent's Pokemon is primarily a Special Attacker using Special moves, switch in a Specially Defensive Wall.
Walls often have some form of recovery, by moves such as Recover, Roost, Wish, Rest, Moonlight, Morning Sun, Slack Off, Softboiled and Synthesis.
Examples:
Defensive Walls:
Skarmory, Cofagrigusk, Gliscor
Specially Defensive Walls:
Snorlax, Dusknoir, Blissey
The SweeperNamed Sweeper because of it's ability to potentially "sweep" through teams very quickly.
Many teams utilise 1, or maybe 2 Pokemon whose sole purpose is to lower the HP of the opponent as much as possible. These Pokemon are always fully invested in Attack or Special Attack, (depending on their base Stats) and often have maximum Speed too, because they want to attack first and not have to take damage, which is characterised by their poor Defence/Special Defence.
Examples:
Attacking Pokemon:
Absol, Arcanine, Gyarados
Special Attacking Pokemon:
Alakazam, Espeon, Hydreigon
The Offensive Set-UpThe idea of this Pokemon is to use Stat raising moves such as:
- Swords Dance (+2 Attack)
- Nasty Plot (+2 Special Attack)
- Work Up (+1 Attack and +1 Special Attack)
- Bulk Up (+1 Attack and +1 Defence)
- Calm Mind (+ 1 Special Attack and +1 Special Defence)
- Dragon Dance (+1 Attack and +1 Speed)
- Curse (+1 Attack, +1 Defence, -1 Speed)
- Quiver Dance (+1 Special Attack, +1 Special Defence, +1 Speed)
- Shell Smash (+1 Attack, -1 Defence, +1 Special Attack, -1 Special Defence, +1 Speed)
in combination with strong attacking or special attacking moves.
This Pokemon is best utilised when the opponent is dealing minimal damage to it, or if the opponent's Pokemon is asleep or frozen.
Examples:
Volcarona with Quiver Dance, Lucario with Swords Dance, Simisage with Nasty Plot, Cloyster with Shell Smash and Gyarados with Dragon Dance.
The Cleric/SupporterThe Cleric can be used to alleviate Status' off your team (Poison, Burn, Paralysis, Frozen or Sleep) through moves such as Heal Bell and Aromatherapy. It may also use Wish (A recovery move) and switch out to a Pokemon with low HP, to take the Wish's recovery boost.
Since its primary role is to heal the team, it should have a high HP itself to take hits, as well as a high Defence or Special Defense.
The Supporter plays a similar role to the Cleric, in that it uses moves which benefit the team. Prime examples would be Dual Screening Pokemon, which use Reflect to raise the Defence of the team for 5 turns, or Light Screen to raise the Special Defence of the team for 5 turns. It often carries a recovery move too.
Examples:
Clerics:
Blissey, Vaporeon, Umbreon
Supporters:
Xatu, Bronzong, Mr. Mime
The StallThe Stall is very similar to a Wall, in that it boasts high HP, and either a high Defence or Special Defence (or both). This Pokemon is often used to stall out the opponent's Poisoned or Burned Pokemon, by using recovering moves (Recover, Roost, Synthesis etc) to negate the damage being dealt by the opponent's attacks. Moves such as Toxic or Leech Seed (or both) are essential to successfully utilise this set.
It often frustrates the opponent, which may also give you a psychological advantage.
Examples:
Meganium, Skarmory, Blissey
Which moves should I choose?Choosing the correct moves for your Pokemon is
critical if you want to win battles.
When selecting moves that hit the opponent, you will note there is a number for Base Power and a number for Accuracy. The Base Power is the number on the left, and it tells you the degree of Power with which the move will do damage. The Accuracy is the number on the right, and this number is a percentage of 100 as to how often the move will hit the opponent.
It is important to note the Type of your Pokemon, and attempt to choose moves which are of the same type as your Pokemon. This is important because in battling, there is a phenomenon known as Same Type Attack Bonus, better known as
STAB. Using a STAB move will increase your moves base power 1.5x. For example, Earthquake on an Excadrill has a base power of 100. STAB boosts Earthquake's power to 150 because Excadrill is part Ground Type.
For a Pokemon designed to have a high
Attack Stat;
DO NOT CHOOSE ANY SPECIAL MOVES. This Pokemon is made to use PHYSICAL MOVES only, in terms of its attacking moves.
Conversely, for a Pokemon with a high
Special Attack Stat;
DO NOT CHOOSE ANY PHYSICAL MOVES. This Pokemon is made to use SPECIAL MOVES only, in terms of its attacking moves.
I will expand on this more another time.
Thanks for reading,
Axle


 (it's more likely I've been forgotten, or no one cares)